Build a router with OpenBSD (6.2)
A wise french sysadmin told me I was insane writing this article. I was not aware it was impossible. So I did it.
Why ?
I just built a personal router with OpenBSD. It looks crazy !
Crazy people are sacred, because they dream with their eyes open.
As I had troubles finding actual and up to date doc, I thought it would be great writing my own. Let’s be crazy writing a huge article, taking days to complete, in two languages !
Friends don’t let friends use commercial-grade routers.
I am going to describe my installation and it will be a good tutorial for you the same time.
This installation is really great, especially if your ISP does not provide you a router or allow you to use your own. Some french ISP do so, for example those from FFDN.
NB : my installation changed quite a few now. You can read about it there :
Prerequisites
This tutorial aims to be didactic and pedagogical. But that cannot work if you don’t know about OpenBSD, IP, NAT or DNS. You will find good stuff about networking here.
Hardware
I bought an APU from PC engines.
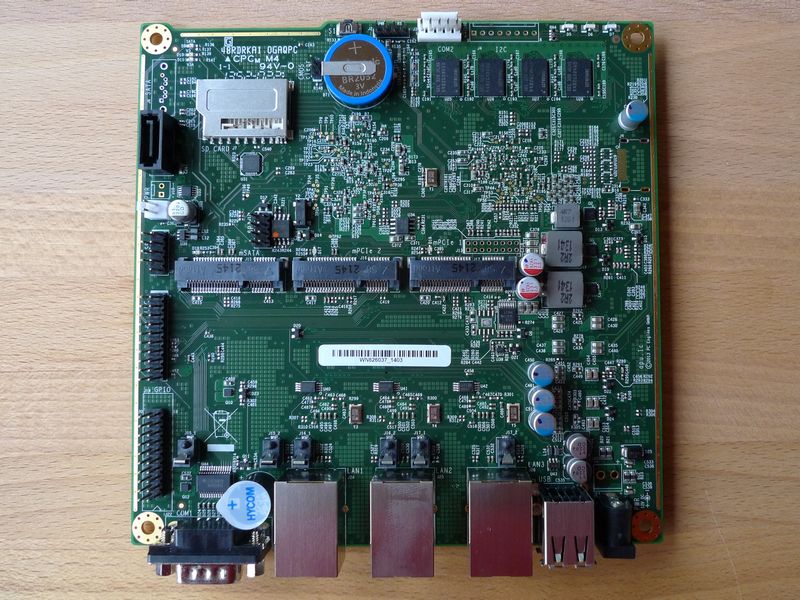
You can obviously use something else, like an old desktop tower, as long as it has at least two network cards. You can surely add one or more cards in it. Good side with an old desktop is the ability to use a true oldschool hard drive.
If you buy an APU, I advise you to buy also the serial cable, or usb-serial to control the machine during installation and upgrades. In that case, I also suggest a SSD as hard drive. It has became cheap and easy of use compaired to the original solution (a SD card mounted read-only).
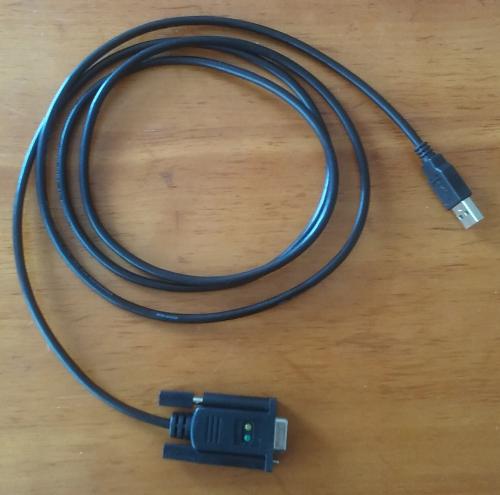
usb-serial cable
If you wish to have a wifi card, buy it the same time, with the two antennas and pigtails.
Network Topology
A router is used to connect two or more networks. It is therefor really important to know how it’s going to work. Because there is a trap!
You will surely connect one of the Ethernet interfaces to the internet connection internet itself, and the others to the LAN. Most documentations tell you to use a bridge(4) virtual interface with vether(4) on your LAN interfaces. Result is that your various interfaces run all together with only one address map. It is a very bad idea. The machine becomes incredibly slow while establishing connections (opening any random web page takes ages).
NB : I have now (october 2019) solved that problem and described it in this article. I don’t pretend to understand what was the actual bug in the first place.
Better to frankly have several sub-net with each its network mapping.
If you wish to have several Ethernet interfaces available, a switch shall be much more effective. Interconnecting the various sub-nets (Wifi ↔ Ethernet 1 ↔ Ethernet 2) will be done at the routing layer, which you still need to setup correctly to access the net.
If you wish to have Wifi, you can even make your life easier, and the machine work lighter, using a wifi access-point. I did that a few years ago. Good side is that the access-point itself is almost transparent. No need for another sub-net nor the configuration. Bad side : you need to buy the access point, set it up, you have one more electric outlet used and it is going to be a bit more expensive on the power side itself.
I prefer have all those functions in one single point. It is not that complicated.
Here is my network topology:

Installation
Installing the operating system itself should not be more difficult than any other OpenBSD install.
The hardest might be to know how to control the machine for the first time (and as long as we don’t have actual network connectivity and ssh up and running).
In a Linux or BSD terminal, you are to use cu or screen as Root. I think there are more possibilities, but it’s already good enough I think.
Set the SD card in the apu, plug the electric wire in, then the serial cable. As I have a usb-serial cable, the APU appears like a usb device on my laptop (Jabberwocky) :
[stephane@Jabberwocky ~]$ dmesg|tail
[12527.053556] usbcore: registered new interface driver usbserial
[12527.053574] usbcore: registered new interface driver usbserial_generic
[12527.053587] usbserial: USB Serial support registered for generic
[12527.058604] usbcore: registered new interface driver ftdi_sio
[12527.058624] usbserial: USB Serial support registered for FTDI USB Serial Device
[12527.058720] ftdi_sio 2-1.2:1.0: FTDI USB Serial Device converter detected
[12527.058774] usb 2-1.2: Detected FT232RL
[12527.059219] usb 2-1.2: FTDI USB Serial Device converter now attached to ttyUSB0
Let’s connect to the apu via the local machine:
[stephane@Jabberwocky ~]$ sudo screen /dev/ttyUSB0 115200
First parameter is the connection speed in bauds. Don’t ask me about it, I have no idea what it means. If you get a blank screen, just hit enter once or twice.
With cu, it shall be:
sudo cu -s 115200 -l /dev/ttyUSB0
If you still don’t have a command line at this time, so unplug and plug again the electric wire without unplugging the serial cable itself.
If you have not understood it clearly yet, you are going to control the router through your local machine, using its keyboard and screen. This local machine will be fine and you can still use it for any other task while you are on the router control.
During all the install’ phase, you will be Root on the apu, through the serial cable, ok ?
Interfaces ? Which interface is what in the system ?
Let’s have a look at it with ifconfig :
ifconfig
lo0: flags=8049<LOOPBACK,RUNNING,MULTICAST> mtu 32768
        priority: 0
        groups: lo
        inet6 ::1 prefixlen 128
        inet6 fe80::1%lo0 prefixlen 64 scopeid 0x6
        inet 127.0.0.1 netmask 0xff000000
re0: flags=18843<BROADCAST,SIMPLEX,MULTICAST,MPSAFE> mtu 1500
        lladdr 00:0d:b9:3e:a8:10
        priority: 0
        media: Ethernet autoselect (10baseT half-duplex)
        status: no carrier
re1: flags=18802<BROADCAST,SIMPLEX,MULTICAST,MPSAFE> mtu 1500
        lladdr 00:0d:b9:3e:a8:11
        priority: 0
        media: Ethernet autoselect (10baseT half-duplex)
        status: no carrier
re2: flags=18843<BROADCAST,SIMPLEX,MULTICAST,MPSAFE> mtu 1500
        lladdr 00:0d:b9:3e:a8:12
        priority: 0
        media: Ethernet autoselect (10baseT half-duplex)
        status: no carrier
enc0: flags=0<>
        priority: 0
        groups: enc
        status: active
pflog0: flags=141<UP,RUNNING,PROMISC> mtu 33144
        priority: 0
        groups: pflog
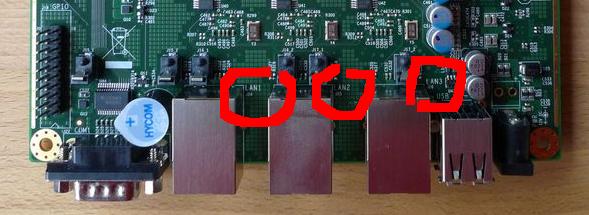
The MAC addresses to the interfaces, lladdr, are following each other and their last number corresponds to the network interface.
It is my case. I am not sure it will be yours, even though I think it will be.
While plugging an Ethernet wire in the interface and launching dhclient, one can see the physical interface corresponds to the one immediately below in number.
I mean that LAN1 on the board (yes, hard to see this one!), will be re0 in the OS.
As soon as you have figured out everything, I advice you to write it on a paper or a sticker and stick it on the router box or inside it.
I wrote down the MAC addresses and what interfaces they point to, and connection speed in bauds.
I gave my machine the name “Alix”, even thought it is an APU.
Configuration
Conf’ files’ style
When possible, I apply these rules to my conf’ files:
- Lots of tabulations to align fields vertically, specially when the conf’ lines look alike.
- Every time I find a code on the web, I set in a comment just above the url, and date when possible.
- Every time the line is not obvious, I tell its use in a comment above.
- Better comment a line rather than suppress it when working or debugging.
- Cleaning the configuration (erase commented lines) only after several weeks working on the current conf'.
- Cleaning should be conservative. Better keep a commented option rather than crying in despair two months/years later when you need it.
- Don’t hesitate to set void lines.
As a matter of fact, my conf’ files are quite neat, even if they can be a bit messy because of this conservatism. Yet, someone recently complimented me for the cleanliness of the pf.conf I show below, where you will see benefits to those rules.
I advise you to get inspired.
Public address : re0
I connected the re0 interface to the internet modem.
/etc/hostname.re0
dhcp
up
It is much possible your ISP has a different configuration.
/etc/dhclient.conf
send host-name "alix.22decembre.eu";
ignore domain-name-servers, domain-name;
I doubt the send host-name to be useful. Opposite, the ignore line is mandatory if you want to use your own dns resolver. Otherwise, the resolv.conf will be overwritten at each DHCP request, even if your address is static.
As soon as you can ping a well-known ip (let’s say 8.8.8.8) then your internet connection is active. You can now go to the local networking.
Lan
I decided to set my LAN with 10.0.0.0/8. Each sub-net (Wifi and Ethernet) will be a /16, which makes a lot of space to do naughty things.
Ethernet: re2
The re2 interface will serve the local Ethernet network and I am going to assign it the 10.0.0.1 address. Interfaces’ files use the syntax described in the hostname.if(5) manual:
inet address netmask broadcast address
/etc/hostname.re2
inet            10.0.0.1     255.255.0.0     10.0.255.255
up
Wifi: athn0
The athn0 interface is actually the wifi card from my computer which just gone dead during the period I was building this router. Yours might be something else. If you buy a wifi card, try to check it can support the hostap mode, meaning it can be an access-point.
I give it the 10.1.0.1 address.
/etc/hostname.athn0
inet            10.1.0.1    255.255.0.0    10.1.255.255
mediaopt        hostap
nwid            nomderesau
wpakey          motdepassereseautreslongetcomplique
up
I use wpa rather than OpenBSD solution, which implies letting anybody who knows the ssh password.
Trouble with ssh is that some people do not have it on their computer, or do not know about it at all.
Tada… I had a Geeksphone Revolution with FirefoxOS but with no ssh client on it. I was not going to lock myself out of my own network. Same, Windows does not have an ssh client on it. Even some Linux distro don’t have it !
Something else about it is that some of your mates come at your place and will use the wifi to browse the net. I am not going to explain those poeple about ssh nor how to use it.
If you intend to use OpenBSD solution, feel free (you can even write me about your own blog article, I will gladly link it there).
To change the network name or the key, you just have to edit hostname.athn0 and reload the conf':
stephane@alix:/home/stephane doas sh /etc/netstart athn0
doas (stephane@alix.22decembre.eu) password:
stephane@alix:/home/stephane
NFS and YP
Now that there is local connectivity, we are going to use it.
I already share the server’s /home via NFS. So let’s mount it on Alix:
/etc/fstab
70f100c03c540720.b none     swap    sw
70f100c03c540720.a  /       ffs     rw,noatime,softdep 1 1
70f100c03c540720.d  /usr    ffs     rw,nodev,noatime,softdep 1 2
70f100c03c540720.e  /var    ffs     rw,nodev,nosuid,noatime,softdep 1 2

swap                /tmp    mfs     rw,nosuid,nodev 0 0
blackblock:/home    /home   nfs     rw
I did not touch the two first lines. Just added the NFS and the volatile filesystem on /tmp.
Now we can use YP to authenticate. It is quite simple. THe procedure on the server side is described on the bottom of the article. On the router, just add an YP domain name in /etc/defaultdomain. Then add “+:::::::::” and “+:::” to /etc/master.passwd and /etc/group and regenerate passwd database (as root):
pwd_mkdb -p /etc/master.passwd
Ready to start portmap and ypbind.
Good side of it is that there is only one password, one personal config’ (.profile and other files in /home/user) and a common workspace where you can work on files. Just copy them in the correct place when you are done. Bad side is that if the server is out of order or NFS/YP not running, then you are in troubles.
Ntp
As I have a public fixed ip, I joined the ntp pool. I run this service on the router. It is easier to distribute the address with Dnsmasq.
Sysctl
The file /etc/sysctl.conf allows the configuration of the kernel. In a router case, it is much about IP packets are well forwarded.
net.inet.ip.forwarding=1

kern.bufcachepercent=80
net.inet.ip.ifq.maxlen=1024     # 256 * number of real internet devices
PF
Pf is the firewall and the routing layer all at once. (It is NAT).
Some more advices :
- I don’t use much macros with ports themselves. I prefer setting ports names directly in the conf’ line. That tells me directly what is the line purpose and I can activate or deactivate the whole service (mail for example) in one comment.
- Getting to know about interfaces groups. For example, there is a reason I use self rather than internet on the ntp line, but not somewhere else. (I am actually not nice at this point, you cannot tell why I do so.)
- Write pass policies quite precise and narrow, and few pass any to any, opposite to so many docs I read on the internet.
- Opposite, write large block policies.
/etc/pf.conf
eth="re2"
wifi="athn0"
internet="re0"
blackblock_ipv4="10.0.0.2"

set block-policy drop
set limit { frags 5000, states 30000 }
set optimization normal
set skip on lo0
set skip on enc0
set state-policy if-bound

table <broken> { 224.0.0.22 127.0.0.0/8, 192.168.0.0/16, 172.16.0.0/12, 169.254.0.0/16 \
        192.0.2.0/24, 198.51.100.0/24, 203.0.113.0/24,  240.0.0.0/4, 255.255.255.255/32 }

block in        on egress
block in quick  on $internet   from { <broken> urpf-failed no-route }  to any
pass out all

pass in                 proto udp  from any to (self)      port ntp

pass in on $internet    proto tcp  from any to (egress)    port { https,www }                      rdr-to $blackblock_ipv4
pass in on $internet    proto tcp  from any to (egress)    port { submission,smtp,sieve,imap }     rdr-to $blackblock_ipv4
pass in on $internet    proto tcp  from any to (egress)    port { git,ssh }                        rdr-to $blackblock_ipv4

pass in on $internet    proto { tcp,udp } from any to (egress)  port domain             rdr-to $blackblock_ipv4 port 5355

# nat
match in  on $internet scrub (no-df random-id max-mss 1440)
match out on $internet inet             from !($internet:network) to any nat-to ($internet:0)

# nat64
# trouvé ici : https://firstyear.id.au/entry/19
pass in         quick   inet6 from any to 64:ff9b::/96 af-to inet from (egress:0) keep state rtable 0

# allow ping and co
pass    inet6   proto ipv6-icmp         all icmp6-type { echoreq, unreach }
pass    inet    proto icmp              all icmp-type { echoreq, unreach }

pass            proto { udp,tcp }       from $eth:network to any
pass            proto { udp,tcp }       from $wifi:network to any

# By default, do not permit remote connections to X11
#block return in on ! lo0 proto tcp to port 6000:6010
Dnsmasq
I am going to use Dnsmasq on the router. It is even the only software to install.
Some IRC guys on OpenBSD channel were not so kind to me with such:
Why don’t you use the software in Base ? Several daemons and privsep’ are good things. You lose all benefits from pledge. We already have plenty of docs like that.
Well, if you are not happy with it, don’t read or link this text. Quite simple. I don’t blame you for your opinion. If I publish this doc, it is also to have something in french. It is also good to have other examples of configurations than those in official documentations.
Third-party softwares in packages are not for nothing. For those who don’t know about it, Pledge(2) is a new safety feature recently added to OpenBSD. It has spread fast everywhere in the system. It is not hard to admit it’s a good piece of work.
Dnsmasq is going to be Dhcp and DNS server to the local network. All dhcp clients will be in the local dns zone, which is somewhat helpful.
You still need a full resolver (Dnsmasq is not designed to fit this role). I am just using my previous configuration.
stephane@alix:/home/stephane doas pkg_add dnsmasq
Dnsmasq conf’ file is a long piece of stuff. So I am going to reduce it to the active options. Each option has its explanation, either from the dev’, or from myself.
# Never forward plain names (without a dot or domain part)
domain-needed

# Never forward addresses in the non-routed address spaces.
bogus-priv

# By  default,  dnsmasq  will  send queries to any of the upstream
# servers it knows about and tries to favour servers to are  known
# to  be  up.  Uncommenting this forces dnsmasq to try each query
# with  each  server  strictly  in  the  order  they   appear   in
# /etc/resolv.conf
strict-order

# Send all recursive queries appart from the local ones
# to another server (Unbound on Blackblock).
server=10.0.0.2

# Add local-only domains here, queries in these domains are answered
# from /etc/hosts or DHCP only.
local=/22decembre.eu/22december.dk/

# If you want dnsmasq to listen for DHCP and DNS requests only on
# specified interfaces (and the loopback) give the name of the
# interface (eg eth0) here.
# Repeat the line for more than one interface.

interface=re2
interface=athn0

# Set this (and domain: see below) if you want to have a domain
# automatically added to simple names in a hosts-file.
expand-hosts

# Set the domain for dnsmasq. this is optional, but if it is set, it
# does the following things.
# 1) Allows DHCP hosts to have fully qualified domain names, as long
#     as the domain part matches this setting.
# 2) Sets the "domain" DHCP option thereby potentially setting the
#    domain of all systems configured by DHCP
# 3) Provides the domain part for "expand-hosts"
domain=22decembre.eu

################ wifi

dhcp-range=athn0,10.1.0.0,10.1.255.250, 255.255.0.0,12h

################ eth

dhcp-range=re2,10.0.0.20,10.0.255.250,255.255.0.0,12h

# Set the NTP time server addresses and DNS server addresses
# to the router itself (and unbound).
dhcp-option=option:ntp-server,0.0.0.0
dhcp-option=option:dns-server,0.0.0.0, 10.0.0.3

# Set the default target for MX records created using the localmx option.
mx-target=blackblock

# Return an MX record pointing to the mx-target for all local
# machines.
localmx
The router can send mails. So I set it up to send everything to Blackblock, my main server.
/etc/mail/smtpd.conf
# To accept external mail, replace with: listen on all

listen on lo0
accept from any relay via smtp://blackblock
rc.conf.local
The /etc/rc.conf.local on the router:
pkg_scripts="dnsmasq"
portmap=YES
portmap_flags=""
sndiod_flags=NO
ypbind_flags=""

unbound_flags=NO

check_quotas=NO
I deactivate quotas everywhere, otherwise the boot process is really slowed down, due to the fact it has to figure out that I don’t use quotas.
Once you have everything in place, including on the server side (I am thinking about NFS and YP), then reboot the router. You can actually reboot at the command line. You can also make sync and then unplug and plug again if you have an APU. It’s a good idea to see your first real boot with still the console cable to see what’s happening.
Conf’ on the serveur
Route
You need to set the route on the server, so the router’s Ethernet address:
/etc/mygate
10.0.0.1
hostname.if
The server is of course on static address. My server has also an re interfaces:
/etc/hostname.re0
inet            10.0.0.2        255.255.0.0     10.0.255.255
inet            10.0.0.3        255.255.0.0     10.0.255.255
up
NB: The 10.0.0.3 address is setup to unbound. This way all my nameservers have a dedicated address, which makes it truly easier for debugging :
- NSD, authoritary server for my domains listens on 10.0.0.2 (on which points the name blackblock)
- Unbound, resolver and validator listens on 10.0.0.3 (on which I set the name unbound to ease my life)
- Dnsmasq, local DNS daemon listens on the router’s LAN interfaces.
The two last ones talk to each other and are announced by Dnsmasq dhcp.
As we want to allow the router to send mail to the server, you have to tell it to accept mail from the local network.
The point here are the lines with localnet:
table domains { 22decembre.eu, 22december.dk }

pki blackblock.22decembre.eu key                "/var/le/certs/current/serverkey.pem"
pki blackblock.22decembre.eu certificate        "/var/le/certs/current/cert.pem"

listen on lo0

table localnet { 10.0.0.0/8, 127.0.0.1, fe80::/64, 2001:470:2099::/48}

#table localnet file:/etc/localnet
table aliases file:/etc/mail/aliases

# écoute pour les courriers en entree
listen on $eth  port smtp           tls     pki blackblock.22decembre.eu
listen on $eth  port submission     tls     pki blackblock.22decembre.eu auth

accept from source <localnet>   for domain "*.22decembre.eu"    alias <aliases> deliver to lmtp "/var/dovecot/lmtp"
accept from any         for domain <domains>            alias <aliases> deliver to lmtp "/var/dovecot/lmtp"
accept for local                                        alias <aliases> deliver to lmtp "/var/dovecot/lmtp"
YP
If you have not yet set up YP, it is the right moment.
Set the YP domain name in /etc/defaultdomain and initialize the system with ypinit -m.
Then, you just have to do, as root:
# cd /var/yp
# make
I have a cron task running regularly on the server to update it. So if I change my password on the server, the router has it fast.
You can obviously tweak your YP settings, but I am not going to help you here.
Just have to launch portmap, then ypserv. You are done.
Unbound
Out of the details given here, there are two interesting details: the forwarding of all local requests on Dnsmasq (so router address) and assignment of a specific listening address for unbound:
server:
    interface: 10.0.0.3
    interface: 127.0.0.1

forward-zone:
        name: "10.in-addr.arpa."
        forward-addr: 10.0.0.1

forward-zone:
        name: "22decembre.eu."
        forward-addr: 10.0.0.1

forward-zone:
        name: "22december.dk."
        forward-addr: 10.0.0.1
NSD itself being unchanged from the given article, I won’t describe it.
/etc/resolv.conf
Resolv.conf on the server and the router ought to point to the same addresses: router and server themselves.
If it cannot resolve, Dnsmasq forwards requests to Unbound like said in /etc/dnsmasq.conf while still being really fast on local addresses.
search 22decembre.eu
nameserver 10.0.0.1
nameserver 10.0.0.3
/etc/hosts
Same as resolv.conf, the hosts file should look alike on the router and the server. They should contain the router’s addresses, the server’s ones and its aliases. You should also have all static ip addresses, at least in the router’s one, so Dnsmasq will get them here and everyone in the network shall have them.
127.0.0.1       localhost localhost4

10.0.0.2        blackblock photos biblib www
10.0.0.3        unbound
10.0.0.1        alix
10.1.0.1        alix
What’s new ?
I hope this will help you build your own router. I remind you this text is under CC-by licence, which means you can use it as long as you provide a link back to this article.
Comments are welcome to bring in more technical details. You can also mail me. I shall update if I receive something interesting.
You should read the next article. It complete this one.
PS: If you liked the article, or found it useful, or if you simply like me, you are very much welcome to tip or give via liberapay.